
Setting up your email on Apple iOS 11 and 13?
You will need your incoming mail server, outgoing mail server, full email address, and your email password. The default settings are listed below.
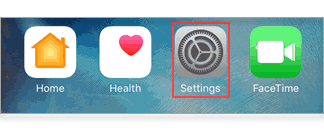
- Go to your phone Settings.
- Swipe up to Passwords & Accounts.
- Tap Add Account.
- Select Other.
- Tap Add Mail Account.
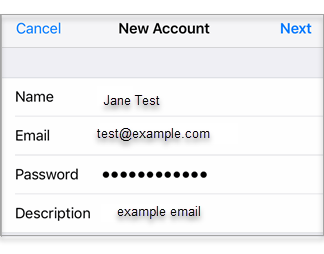
- Fill in the following information:
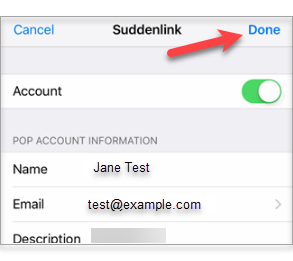
- Name: How you want your name to appear in emails (example: Jane Test)
- Email: Your full mailbox address (example: [email protected])
- Password: Your mailbox password
- Description: Distinguish this email connection from others you might have set up on your Apple device.
- Select Next.
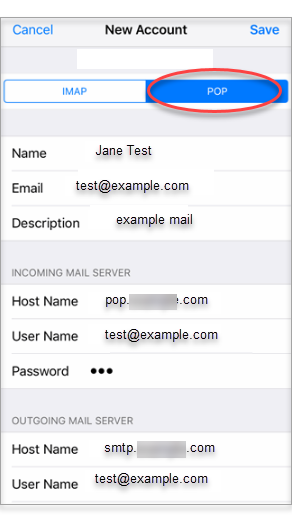
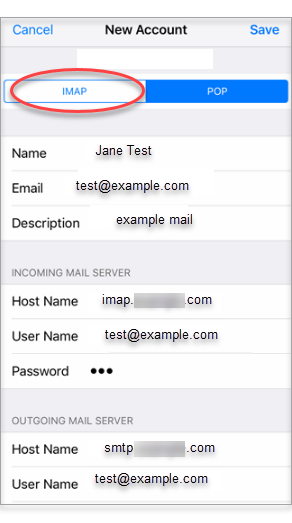
- Choose POP or IMAP. IMAP synchronizes the email on your phone with the contents of your account on the server, while POP simply downloads the inbox.
- Fill in the following information depending on the protocol you chose in Step 9:
- POP
- Name: The name to display on your email
- Email: Your full mailbox address
- Description: Distinguish this email connection from others you might have set up on your Apple device.
- Incoming Mail Server: POP
- Host Name: pop.domain.com
- User Name: Your full email address
- Password: Your email account password
- Outgoing Mail Server (SMTP) Host Name: smtp.domain.com
- User Name: Your full email address
- Password: Your email account password
- IMAP
- Name: The name to display on your email
- Email: Your full mailbox address
- Description: Distinguish this email connection from others you might have set up on your Apple device.
- Incoming Mail Server: IMAP
- Host Name: imap.domain.com
- User Name: Your full email address
- Password: Your email account password
- Outgoing Mail Server (SMTP) Host Name: smtp.domain.com
- User Name: Your full email address
- Password: Your email account password
- POP
- Tap Save.
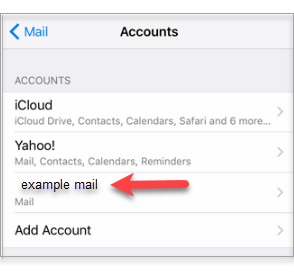
- Go back to Accounts and select the newly set up email to input the port numbers.
- Swipe up and tap Advanced.
- Fill in the following information:By default, the IMAP and POP protocols work on two ports:
Port 143 – this is the default IMAP non-encrypted port;
Port 993 – this is the port you need to use if you want to connect using IMAP securely.
Port 110 – this is the default POP non-encrypted port;
Port 995 – this is the port you need to use if you want to connect using POP securely.- Use SSL: toggle the slide button to switch on and off SSL
- Authentication: Password
- S/MIME: Off

- Go back to the previous page and tap SMTP.
- Go to the Outgoing Primary Server.
- Fill in the following information:
- Server: On
- Host Name: smtp.domain.com
- User Name: Your full email address
- Password: Your email account password
- Use SSL: Off
- Authentication: Password
- Server Port: 587
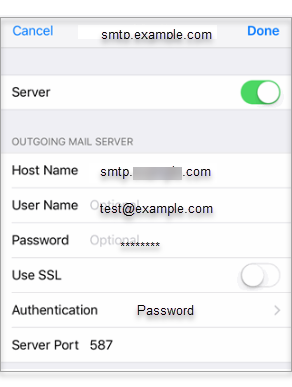
- On the top right corner, hit Done.
- Go back to the email account settings page and tap Done.
- Select Continue if you get a message stating that the server identity could not be verified.
- The email setup for your Apple Device is now complete. You can view your messages through your device’s Mail app.
Reference: https://www.domain.com/help/article/email-client-setup-apple-ios-11-and-13?utm_source=google&utm_medium=genericsearch&gclid=CjwKCAjw2OiaBhBSEiwAh2ZSP4KgLL6PKM-CRrWmVobAdUQ7IKNsAsLX3lpB66NHPpPUXQ6pFuAlwBoCw9YQAvD_BwE&gclsrc=aw.ds