How to add the additional IP in VPS server(Ubuntu 24.04)?
Step1. Login to the z.com account. (https://cloud.z.com/mm/signin/)
Go to “Cloud” on your panel
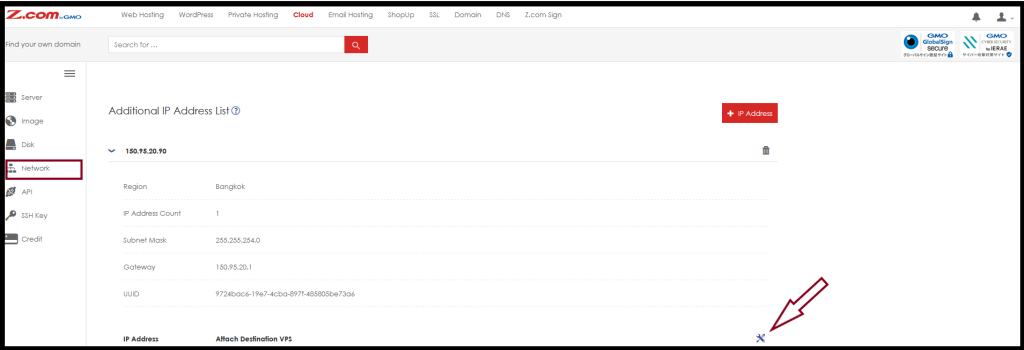
Step2. Click on the “Network” under the Cloud tab.
Then, you will find the IP number when the additional IP is active. Click on the IP number to add that IP to the VM name you want to use. Before we do the following process, we need to shut down the server first.

After you click on it, there will be a box. Click on the VM name you want to add the IP to under the topic “Attach Destination VPS”. You can follow the picture.

After pressing Save, we go back to the VM machine again to start the server to use the additional IP command to the server machine again.
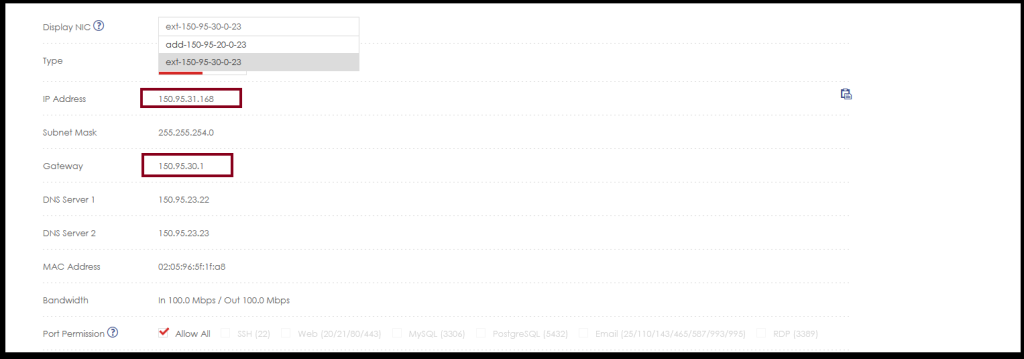
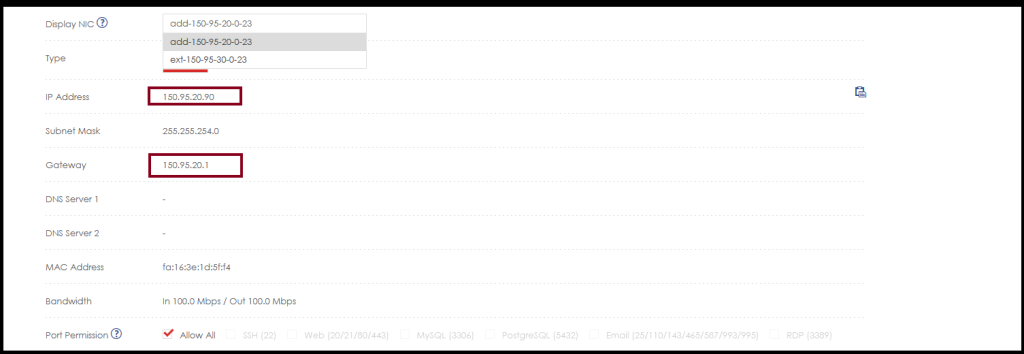
Step3. How to enter values: Please copy the additional IP in Notepad first to prevent errors. Adjust the Display NIC to the IP of the main machine first. Then enter the values as shown in the picture.
Main IP Information, you can check this information in “Network Information” under your Cloud VPS.

For Additional IP information, you need to chose Display NIC option for the additional ip information. Then you can check the information.

Step4. Login to the server with SSH. Then enter the command and write the configuration file.
#nano /etc/netplan/10-gmovps.yaml


network:
version: 2
renderer: networkd
ethernets:
eth0:
addresses:
- 150.95.31.168/23
routes:
- to: 0.0.0.0/0
via: 150.95.30.1
table: 101
routing-policy:
- from: 150.95.30.0/23
table: 101
eth1:
dhcp4: no
addresses: [150.95.20.90/23]
routes:
- to: 0.0.0.0/0
via: 150.95.20.1
nameservers:
addresses: [8.8.8.8,8.8.4.4]
If you setup the configuration saves the file.
Step5. Then you need to change the file permission.
#sudo chmod 600 /etc/netplan/10-gmovps.yaml

Step6. Enter the following command:
#sudo netplan apply

Step7. After applying netplan, you can test ping ip or ifconfig.

Step8. If the process is all finished, you can login to the SSH via additional IP also.


Thank you.!!!
